Monday 31 March 2014

Texturing and ready to mess to the rig


After creating my expressions for bender, the next task was to get bender into his textured form, using editable poly ID to section out certain parts of the head, like the mouth and eye mask, the ids were used to help texture the head with the material editors Multi- sub object material option

The eye mask uses a standard black texture, the mouth was created in Photoshop, using black lines and using benders mouth colour, but to finish the mouth a UVP had to be used from the modifier panel to align and position the mouth texture.

With the eye mask texture, in place the black eyebrow pieces are now hidden in the same colour to give the impression of a facial expression.


An example screen shot above is showing a set of eyebrows key framed to show how it is making bender look like he is getting angry.


Using ids and the material editors multi-sub object option i  give bender the correct textures on the arms and legs that i constructed in Photoshop.


This screen shot above shows the finished textured bender model, the body was the only mesh piece not to use an id, the door on the front of the body is part of the texture, using tiling in the material editor to position the texture correctly.


The last thing for the bender model heads they received the eye pupil texture that i made in Photoshop and then placed on the eye cylinders.


This model has the same as bender, but the devil robot has his own textures that were created in Photoshop and using ids in the editable poly modifier and the material editor multi-sub object option, the devil robots legs and arms received the matching colour scheme of the programs counterpart.which i think i matched very well.


Sunday 30 March 2014

Bender and the devil robots facial expressions


To create the facial expressions for my 3d character mesh, i have constructed a different way to make my characters  facial expressions, they are constructed differently because they are to look like a  metal material,  so the whole face does not move and they don't have a nose or moving mouth or eye brows, so there for it has no muscles within the face to work with for expressions.


my solution is to create facial expressions for the characters that don't have muscles or eyebrows, so i created the eyebrows in  separate pieces that will be linked to the head and will be textured black like benders head eye mask, this way when linked  the eye mask with these extra pieces will be animated to make bender have  expressions.


The eyebrow pieces are turbo smoothed to finish it off. 


Here is a screen shot of an example of what expressions bender will have, each head will feature a number of different expressions and I plan as i animate the scenes, to switch between different versions of bender's head to create the animation video.


An alternative head of bender has to have eyes that extend out of his head to make bender zoom in on a situation, that i want bender to do in the story board. i used the same eyes as before but altered the sphere  for the eyes, by  using the editable poly to select and stretch the sphere, to create the extended look, i think this worked well.


Featuring 10 different expressions for bender, all possible expressions that I could use for my scenes.


The devil robot uses the same idea with black planes to create facial expressions, scaled and narrowed to fit inside the eye recess and finished with a turbo smoothed


The devil robot shown in the storyboard requires less facial expressions because he mostly shows his evil face.

Sunday 16 March 2014

Futurama Building Designs - Sample images to help create and design for my Bender and Devil Robot Scene


Here are a collection of the Futurama building image references, these were colllected to help design and create and reference Benders and the devil robots city enviroment, which is needed in my storyboard story.

Although the buildings may not be 100% correct to these images, they will be my interpretation designs of buildings seen in the show.

Sourcing these example images, i will create a number of buildings for benders walking down the street scene at the beginning of the animation, leading to the main building where bender and the devil robot have there roof top fight.

The next step is to sketch some designs of the furturma building in my sketch book with a front, side and top view to help me when designing the buildings in 3ds max.

Seven to eight different types of building will do to help stop background repetition.


References:

http://futurama.wikia.com/wiki/File:500_foot_tall_Zoidberg_and_The_Apollo_Theater.png

https://static.squarespace.com/static/51b3dc8ee4b051b96ceb10de/51ce6099e4b0d911b4489b79/51ce61ffe4b0d911b44a8c11/1324310555107/1000w/Futurama.jpg
 

http://images3.wikia.nocookie.net/__cb20090612035826/en.futurama/images/thumb/c/c3/Applied_Cryogenics_building.jpg/500px-Applied_Cryogenics_building.jpg
  

http://img2.wikia.nocookie.net/__cb20080112181440/en.futurama/images/7/70/Madison_Cube_Garden.jpg
  
  http://img839.imageshack.us/img839/8895/grab1.png

Week 6 - Animating a rig - experimenting and learning.


After learning and looking into how to animate a character rig, i decided in practice i would use the 3ds max preset existing rigs and animate some of its features.

Choosing the alien rig, I was able to make him walk, waving his hand and animate his entire right hand to do a sort of slap, to look like a back slap.

Whist doing this i have noted that if you want to have a walk cycle and also have animating features, like a hand waving etc, you have to put the walk cycle layer first then add adjustment layers after,other wise if done the other way around, the walk cycle will stop the adjustment layers from working, its as if the walk cycle is the dominant layer in animating on 3ds max.

Also noting, when animating features after the walk cycle, Adjustment L + W work best.

With the setup, animation toggle play button pressed, and the layers selected, auto key the keys to move the character.


Rig Construction - Bender & The Devil Robot


To start the rig construction on bender, i first focused my attention on creating the legs, compared to the devil robots legs that come out from the sides of his pelvis, benders leg design is slightly different, as his legs are attached to his body from directly underneath, the custom rig have its legs default to the sides of the pelvis, the model tool was required to straighten the legs and place them directly under the pelvis.

Also noted on benders design even though the legs have knee joints, the rig legs will be positioned as straight as possible, because benders leg design does not have knees.


After sorting out the basic positioning of benders rig legs, this screen shot now focuses on a added spine with 5 segments as standard, but as this spine is not needed to bend benders body, it's just there to help build up the rig.


A close look on the rig construction, the arms are created using two bones, one long one for the arm and one scaled one for the hand.


 The head construction was made using another spine and an add bone tool, which is not connected by a spine and can be placed anywhere near the last spine or rig section, doing this the head mesh will be linked to this add bone rig piece, this way the head mesh and rig piece can help not disjoint the rest of the model when animated.


 A screen shot showing the head add bone rig piece being scaled to the size of benders head.


A process overall shot so far and at this stage benders rig is coming on really well, with some minor adjustments to the legs, adding benders fingers and making sure all the rig pieces are inside the mesh, bender is almost ready to be linked together.


Using the scale tool to scale down the legs to fit in the mesh.


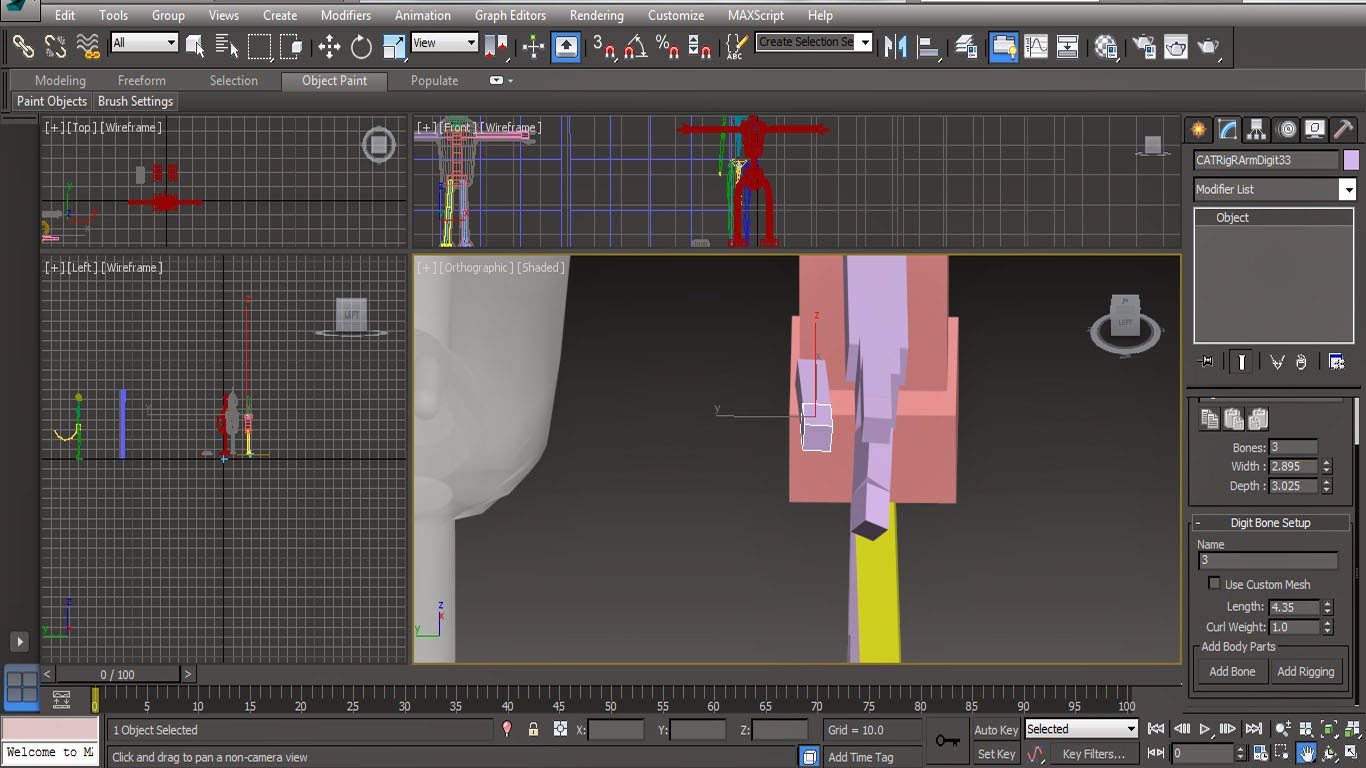
 Using the add bone option again, three square rig fingers were created, each finger has three segments, this was done to help the fingers bend, if he is required to grab something.


A screen shot of the fingers scaled and positioned in place.


 A finished overview shot of bender.


 Moving onto the devil robot, he was a bit easier to work with as his legs are designed to come out of his pelvis, but as his legs are designed to bend out and round, more leg sections were needed { 4 pieces }
each piece was rotated, scaled and positioned in place to the mesh.


 Using the same idea for the arm rig construction as bender, the fingers are also add bone pieces with three sections to help the devil robot grab things and bend this fingers.


The overall design of the devil robot was a lot better for placing a rig because the devil robot has multiple connecting body pieces, so the devil robots rig construction is made up of a lot of spines, from his tail, to his neck.


 A screen shot showing the devil robot receiving his neck spine to the back of his head, each spine has 4 sections as this is plenty for the devil robot to bend his head up and down, the neck being curved, the spine pieces had to be selected and rotated and scaled to follow the shape of the neck.


Another add bone was added under the head to help operate the jaw to open and close it.


An overview shot of the finished rig.